Supply List:
Fondant – white, red, and black
Premade red and black fondant (you can color your own but I prefer to just buy it)
Gel food colors- black, ivory
Nesting Circle cutters
Nesting Square cutters
Small Leaf cutter
Paint brush and water
Tip #3
Pink petal dust
Paint brush
Knife
(Just click on pictures to enlarge)
Step 1: Color fondant ivory. Then roll out and using a circle cutter make circles for the faces.
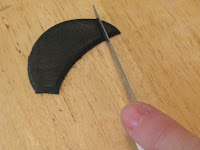
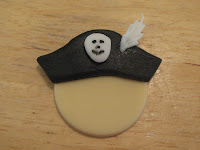
Step 2: Next roll out black fondant and cut circles using the largest circle cutter. Then using the same cutter place it a little more than half way up the circle, you will have a shape that kind of looks like a crescent moon. Cut the ends at an angle. Next you will gently push the top sides down to get the contour of the hat.
Step 4: Next you need to give your pirate a little color in his cheeks. Pour a little dust out on to wax paper and then dip your finger in pink petal dust. Rub your pointer finger and thumb together to remove excess dust. Softly rub pointer finger on pirate face for pink cheeks like you did from part 1 of the pirate tutorials.
Step 5: Now you are ready to make your pirates face. Use the end of a paint brush dipped in black gel food coloring to make your eyes. Next using the large end of a tip make an indentation for his mouth and use the end of a paint brush for his dimples. Roll a small ball of ivory fondant for the nose and attach with water. Using a tooth pick dipped in black food coloring paint the captain’s freckles on to his face.
Congratulations- you now have a cute little pirate captain face!
-------------------------------------------------------------------------------------------
Treasure Map
Step1: Roll out white fondant and cut squares using largest cutter.
Step 2: Cut squares into rectangle with knife.
Step 3: Paint map using tooth picks and gel food coloring.
And embellish your map with little designs. I added a palm tree, water, and gold coins.
Step 4: Gently curl ends of map with finger and then let dry on wax paper.
Now you have a cool treasure map too!!!
Coming soon-
Part 3: How to make the Pirate Cupcake Stand


5 comments:
Thank u for your great tutorial. Love it !!!
I'm glad you liked it!
Lovely cupcakes! Still waiting instructions for the stand though!!!
It's coming. Between moving and pregnancy I haven't had much time!
Those are just too cute! I think that my son will have a pirate party just so I can give these a try :) Looking forward to the stand tutorial!!!
Post a Comment