
Ever wonder what to do with all that zucchini from the garden. Why not make a heavenly chocolate cupcake!
Here is a recipe- I hope you enjoy it.
Chocolate Zucchini Cupcakes
Sift Together:
2 cups flour
1 ¼ cup sugar
1 tsp salt
1 ½ tsp soda
½ cup cocoa
Add and stir:
2 tsp vanilla
½ cup oil
1 egg
2 cups finely grated or blended zucchini
1 cup chocolate chips
Preheat oven to 350. Line or grease cupcake pan. Fill each one about 2/3 full. Bake for 18 minutes
Friday, September 24, 2010
Thursday, September 23, 2010
Cranberry White Chocolate Chip Muffins
I have been playing around with my standard muffin recipe and came up with this variation yesterday. They are yummy and moist- give it a try!
Cranberry White Chocolate Chip Muffins
1/2 cup butter or margarine, softened
1 cup sugar
2 eggs
1 teaspoon vanilla extract
1 cup sour cream
2 cups all-purpose flour
1 teaspoon baking powder
1/2 teaspoon baking soda
1/4 teaspoon salt
1 cup dried cranberries
1 cup white chocolate chips
Cream butter and sugar in mixing bowl. Add eggs, one at a time, beating well after each addition. Add vanilla. Fold in sour cream. Combine the flour, baking powder, baking soda, and salt; stir into creamed mixture just until moistened. Fold in cranberries and chips. Batter will be thick! Fill greased or paper-lined muffin cups two-thirds full. Sprinkle sugar crystals over batter. Bake at 375 degrees F for 20-25 minutes or until a toothpick comes out clean. Cool for 5 minutes before removing from pans to wire racks.
Enjoy!
Wednesday, September 22, 2010
Icecream Birthday Party
 My daughter just celebrated her birthday. She had a hard time deciding what theme she wanted to do her party in. She is very girly so all her ideas were very girly but she wanted the boys invited to have fun too. Finally she decided to do a party all about icecream because everyone loves icecream!
Sticking with her theme I made a quick cake that looked like an icecream sundae and I made cake balls dipped in chocolate with an icecream cone on top so they looked like they were upside down icecream cones melting (inspired by Bakerella). I do have to admit that I am not a fan of cake balls but they were very cute! We also let each child make their own icecream sundae- talk about a sugar overload!!!
I used the wilton giant cupcake pan to make the cake. It worked out okay but I think I will do it differently next time and maybe not start the dang thing at 10pm! I always seem to be running behind when it comes to my own children's cakes so to cut down on time I used (GASP!!!!!!!!!!!!!) store bought frosting. All I can say is never again. Anyone that knows me knows I am definitly a fan of home made frosting and NEVER use store bought! The kids thought everything was great and I guess that is what really matters!
Tuesday, September 21, 2010
My Cake and Cupcakes in Magazine!


Cake Central Magazine contacted me this summer and asked if they could include some of my work in their magazine! I obviously said yes. A cupcake display and small cake went into the August issue. HURRAY! It is so incredibly neat to see your own work published! Anyway, here are the two projects that were included. Hope you like them!
Saturday, September 18, 2010
Part 2 Pirate Tutorial- Pirate Captain and Treasure Map
Part 2: Pirate Captain Cupcake and Treasure Map Tutorial

Fondant – white, red, and black
Premade red and black fondant (you can color your own but I prefer to just buy it)
Gel food colors- black, ivory
Nesting Circle cutters
Nesting Square cutters
Small Leaf cutter
Paint brush and water
Tip #3
Pink petal dust
Paint brush
Knife
(Just click on pictures to enlarge)
Step 1: Color fondant ivory. Then roll out and using a circle cutter make circles for the faces.

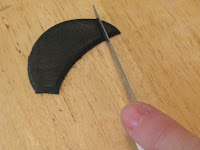
Step 2: Next roll out black fondant and cut circles using the largest circle cutter. Then using the same cutter place it a little more than half way up the circle, you will have a shape that kind of looks like a crescent moon. Cut the ends at an angle. Next you will gently push the top sides down to get the contour of the hat.

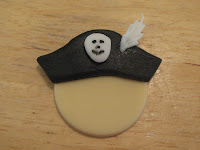
Step3: Roll a small piece of fondant into a ball and then flatten and slightly pinch bottom of flattened ball to make the shape of the skeleton head. Attach the skeleton head to the hat with water. Using a tooth pick dipped in black coloring draw the face of the skeleton. Once the hat has dried a bit attach to the head with water. To make the feather use a small leaf cutter and frill the edges a bit with a ball tool or texture it with a toothpick or veining tool. Let dry a few minutes and then attach to hat with water.


Step 4: Next you need to give your pirate a little color in his cheeks. Pour a little dust out on to wax paper and then dip your finger in pink petal dust. Rub your pointer finger and thumb together to remove excess dust. Softly rub pointer finger on pirate face for pink cheeks like you did from part 1 of the pirate tutorials.

Step 5: Now you are ready to make your pirates face. Use the end of a paint brush dipped in black gel food coloring to make your eyes. Next using the large end of a tip make an indentation for his mouth and use the end of a paint brush for his dimples. Roll a small ball of ivory fondant for the nose and attach with water. Using a tooth pick dipped in black food coloring paint the captain’s freckles on to his face.


Congratulations- you now have a cute little pirate captain face!
-------------------------------------------------------------------------------------------
Treasure Map
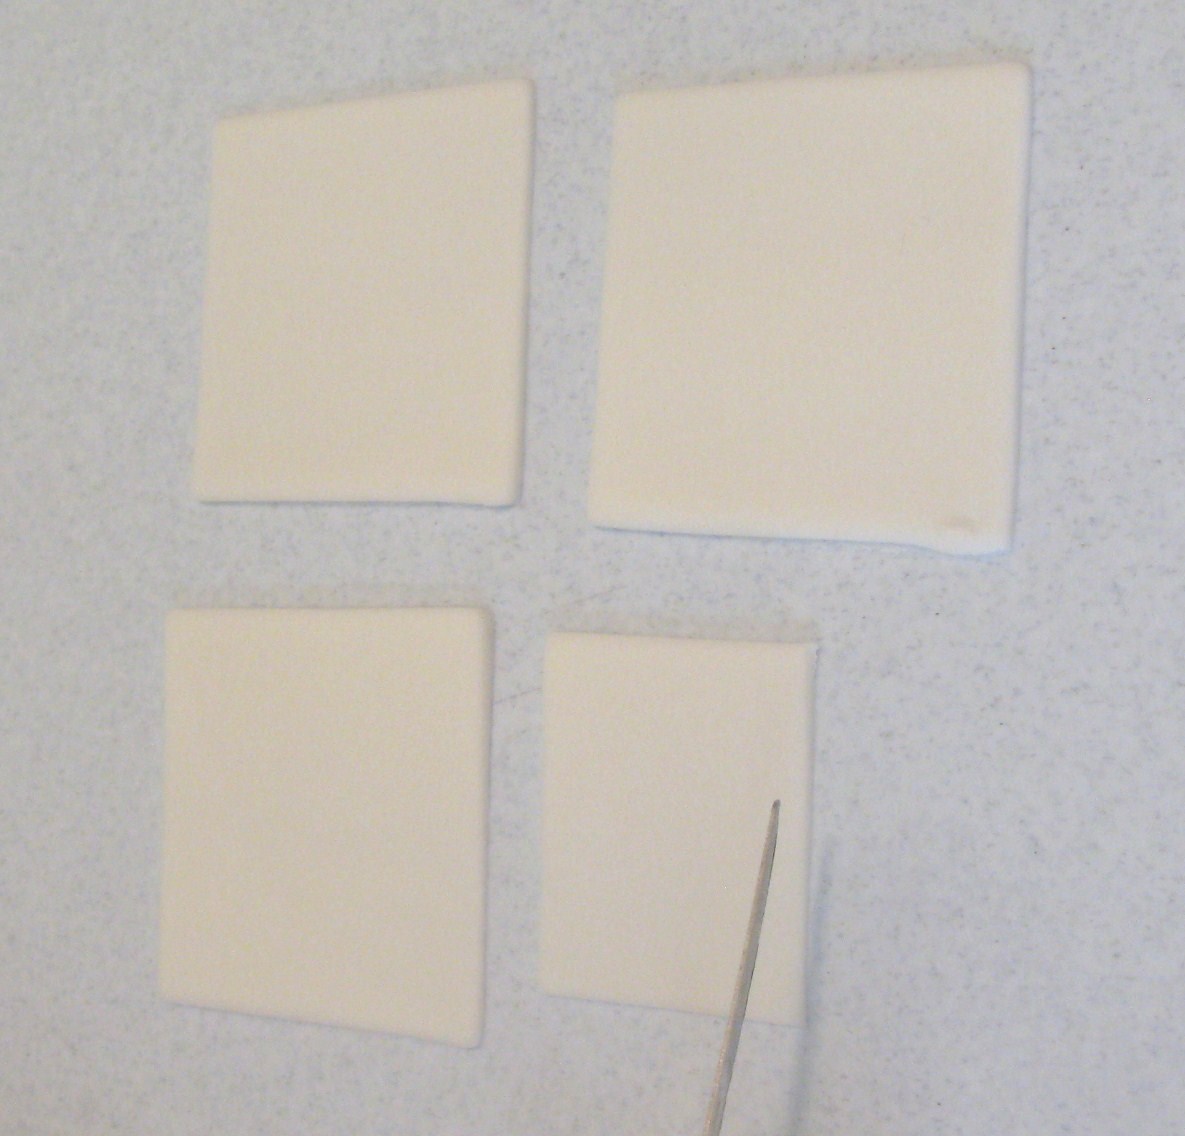
Step1: Roll out white fondant and cut squares using largest cutter.

Step 2: Cut squares into rectangle with knife.

Step 3: Paint map using tooth picks and gel food coloring.

And embellish your map with little designs. I added a palm tree, water, and gold coins.

Step 4: Gently curl ends of map with finger and then let dry on wax paper.

Now you have a cool treasure map too!!!
Coming soon-
Part 3: How to make the Pirate Cupcake Stand

Supply List:
Fondant – white, red, and black
Premade red and black fondant (you can color your own but I prefer to just buy it)
Gel food colors- black, ivory
Nesting Circle cutters
Nesting Square cutters
Small Leaf cutter
Paint brush and water
Tip #3
Pink petal dust
Paint brush
Knife
(Just click on pictures to enlarge)
Step 1: Color fondant ivory. Then roll out and using a circle cutter make circles for the faces.

Step 2: Next roll out black fondant and cut circles using the largest circle cutter. Then using the same cutter place it a little more than half way up the circle, you will have a shape that kind of looks like a crescent moon. Cut the ends at an angle. Next you will gently push the top sides down to get the contour of the hat.


Step 4: Next you need to give your pirate a little color in his cheeks. Pour a little dust out on to wax paper and then dip your finger in pink petal dust. Rub your pointer finger and thumb together to remove excess dust. Softly rub pointer finger on pirate face for pink cheeks like you did from part 1 of the pirate tutorials.

Step 5: Now you are ready to make your pirates face. Use the end of a paint brush dipped in black gel food coloring to make your eyes. Next using the large end of a tip make an indentation for his mouth and use the end of a paint brush for his dimples. Roll a small ball of ivory fondant for the nose and attach with water. Using a tooth pick dipped in black food coloring paint the captain’s freckles on to his face.


Congratulations- you now have a cute little pirate captain face!
-------------------------------------------------------------------------------------------
Treasure Map
Step1: Roll out white fondant and cut squares using largest cutter.

Step 2: Cut squares into rectangle with knife.
Step 3: Paint map using tooth picks and gel food coloring.

And embellish your map with little designs. I added a palm tree, water, and gold coins.

Step 4: Gently curl ends of map with finger and then let dry on wax paper.

Now you have a cool treasure map too!!!
Coming soon-
Part 3: How to make the Pirate Cupcake Stand
Thursday, September 16, 2010
My first Tutorial! Pirate Cupcakes and Display
This is my first tutorial. The pictures could be better but I had fun putting it all together. Just click on the pictures for larger images. Hope you like it!

Fondant – white, red, and black
Premade red and black fondant (you can color your own but I prefer to just buy it)
Gel food colors- black, ivory
Circle cutter
Paint brush and water
Tip #3
Pink petal dust
Paint brush
Knife
Step 1: Color fondant ivory. Then roll out and using a circle cutter make circles for the faces.

Step 2: Next roll out red fondant and cut circles using the same cutter in step 1. Then cut in half and with water attach each half to your ivory circles.

Step3: Roll out a small portion of white fondant and with tip#3 cut out small circles. If they are sticking to the tip just use a tooth pick to gently remove them. Attach them to your red hat with water. Alternate pirate mate has a stripe instead of dots – roll your fondant out, cut stripes, and then attach with water.

Step 4: Next you will need to roll a small ball of fondant into a sausage shape but with pointy ends. Bend it and in the center slightly pinch it. This is the knot on your hat. Attach with water.

Step 5: Next you need to give your pirate a little color in his cheeks. Pour a little dust out on to wax paper and then dip your finger in pink petal dust. Rub your pointer finger and thumb together to remove excess dust. Softly rub pointer finger on pirate face for pink cheeks.

Step 6: Now you are ready to make your pirates face. Use the end of a paint brush dipped in black gel food coloring to make your eyes. Then using the large opening of a tip make an indentation for his mouth and then roll a small ball of ivory fondant for the nose and attach with water. If you are making the alternate pirate face you will also need to add your scar. Just use a tooth pick with black color on the tip and paint the scar on to his cheek.


Congratulations- you now have a cute little pirate face!

Coming soon-
Part 2: How to make the Pirate Captain face and treasure map tutorial
Part 3: How to make the Pirate Cupcake Stand

Monday, August 16, 2010
Ashley Mae Photography Giveaway!!!
A local and very talented photographer is doing a giveaway. Check out her blog for more info! http://ashleymaephoto.com/blog/
Thursday, August 12, 2010
Summer Cupcake Display

Wednesday, August 4, 2010
The Dark Knight Batman Cupcakes


This was a fun project I did for a dear friend. For her son's 25th bday she threw a Dark Knight Batman party for him because it is his all time favorite movie. I made these cupcakes to go along with her theme. Hope you like them!


Friday, July 2, 2010
Come Get A Cupcake!!!
My cupcakes are being sold this weekend at Logan Art House and Cinemas. There are 2 flavors to choose from- chocolate with chocolate bavarian cream filling frosted with chocolate buttercream and vanilla with raspberry filling and frosted with vanilla buttercream. Come try them and ENJOY!!!
My new cupcake business name is "Frosted", what do you think?
My new cupcake business name is "Frosted", what do you think?
Friday, June 11, 2010
My First Cupcake Bouquet

This is my first cupcake bouquet. I have seen better looking bouquets but I do like how it turned out. I made it to give to my daughter after her dance revue tonight. There is another yellow flower on the back side. I made the butterflies with rice paper and petal dust. Cupcakes are vanilla filled with raspberry jelly and frosted with lemon buttercream. TFL!
Friday, June 4, 2010
This is really a cake just made to look like a dutch oven!

Thursday, May 27, 2010
Summer Flower Cupcakes


Saturday, May 22, 2010
Baby Shower Sailboat Cake and Cupcakes


Thursday, April 29, 2010
Retro Black and White Birthday Cake

I saw a design like this and really wanted to try it.
I made it for my friends Bday and I ALSO MADE THE CAKE PEDESTAL WHICH I AM VERY PROUD OF!!!
The decorations are all fondant. TFL!
Friday, April 23, 2010
Mini Apple Cupcakes


I have seen these done using a standard size cupcake and green sanding sugar and have always wanted to make them. My daughter's class had a read-a-thon and got to bring treats so I made these for her to take. She picked the red instead of green. They loved them and so did I- very quick and easy!
Tuesday, April 20, 2010
Q and U Wedding Cake


Sunday, March 21, 2010
Easter Cupcake Class Supply List
Let me know if you have any questions. I'm looking forward to seeing everyone this Thursday!
Supply List:
• White fondant(any brand will be fine)
• small flower cutter set
• pastry bags(disposable is fine)
• tip number 1A and/or 1B and optional tip #230(you won’t need this one in the class but if you want to fill your cupcakes when you make them at home you will need this tip)
• Wilton flower forming set
• Mini Cadbury hard shell candy eggs(jelly beans will do if that is all you can find)
A small donation would be appreciated to help cover the cost of cupcakes, frosting, toasted coconut, and cupcake liners. $3-5 per person would be appropriate.
If you want to use my tools, tips, and cutters instead of purchasing them that is fine with me but then you won’t have the supplies to make more at home. It’s up to you.
***The supplies can be found at Michaels, Hobby Lobby, or Kitchen Kneads***
Kitchen Kneads has offered a 10% discount to my students
The class will be held at my friend, Dee Mckoy's home. If you need directions just send me a message!
Wednesday, March 3, 2010
Easter Cupcake Class
Hi everyone- my freebie class is scheduled for March 25 at 6:30pm. We will be working on an Easter cupcake project. Leave a post or send me a message if you want to sign up. If you can get me your email I will send you a list with the supplies you will need. It should be a fun class- hope to see a lot of you there!
Tuesday, March 2, 2010
Class Freebie
If you live in the area send me a message letting me know what you want to learn and we will have a class. If you bring your own supplies the class is free of charge. I just want an excuse to get together with friends and chat! Let me know what you are interested in learning. I'm thinking we should either have the class on Thursday, March 25 or April 8 around 7pm. Let me know what you think!
Thursday, February 25, 2010
Saint Patty's Day Rainbow Cupake

Thursday, February 18, 2010
Baby Kenneth Cupcakes
 I took dinner over to a friend who recently had a baby so at the last minute I decided to make these for dessert.
 They are classic white with a sweet cream filling colored blue and a whipped buttercream to top them off. The decorations are fondant.

Subscribe to:
Comments (Atom)
Guitar Cuppie
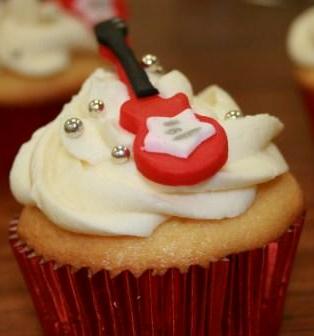
I love how this turned out. I think I am in love with cupcakes!
Ghostbuster Cuppies

Purse Cuppie


